Committing The Code To VSTS

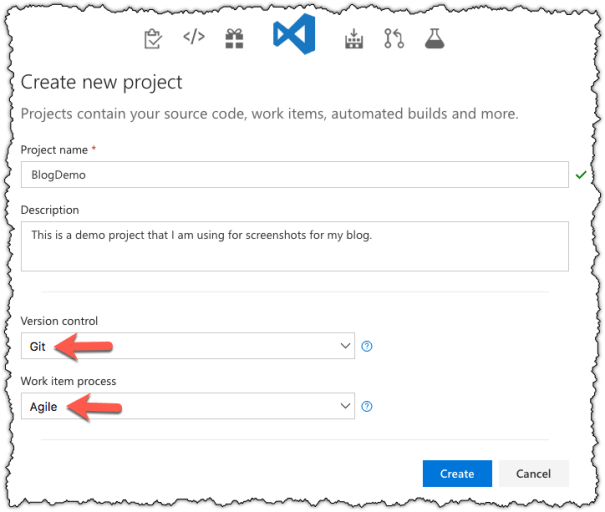
So we have a new project in IntelliJ with the starter layout provided by the Spring Initializer and we have an empty git repository in VSTS. We now have to link the two of these together so that all your future code changes have a place to live.

First we need to tell IntelliJ that this is a git repository. The easy way to do this is use the VCS menu.

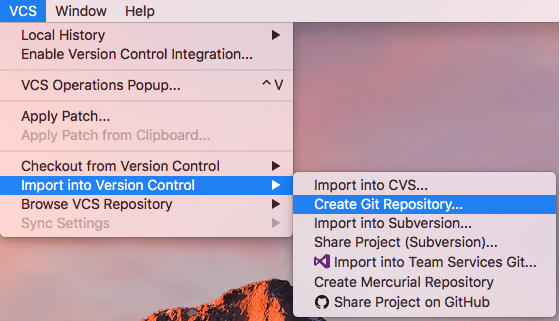
Yes there is an option to ‘Import into Team Services Git’ and you would probably think that this would be the best option to select but it will only work if there is no repository on the VSTS side but as this is a new project on VSTS there is already a repository there (It would be nice if the VSTS Tool could detect that it is a blank repository and allow it to be linked).

Once you have told IntelliJ that this is a git repository you will need to add the existing files to the repository and then commit them.

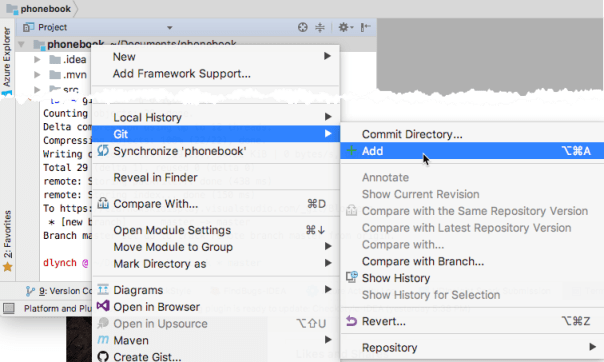
Right click on the top level of the project, find the ‘Git’ menu and then select ‘Add’ to add all the existing files in the project to the repository.

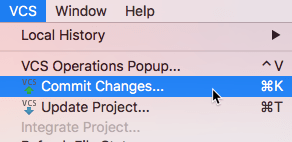
Then click on the ‘VCS’ menu and select ‘Commit Changes’.

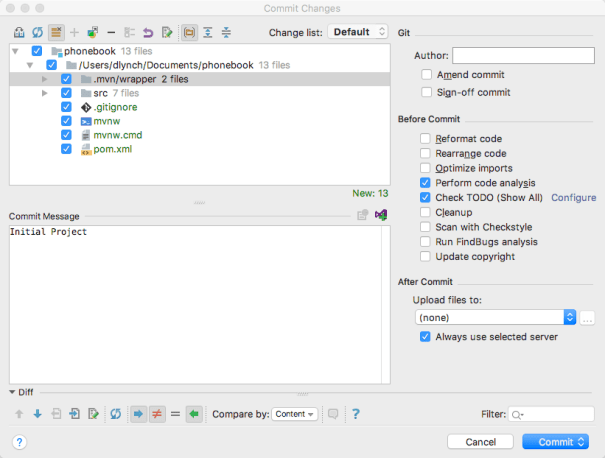
The commit changes dialog box will appear, just go ahead and commit everything.

At this stage we still have not linked the local Git repository and VSTS. To do this we need to use the terminal but before we do that lets have a quick look at the main project screen in VSTS as that will give us the commands we need to use…

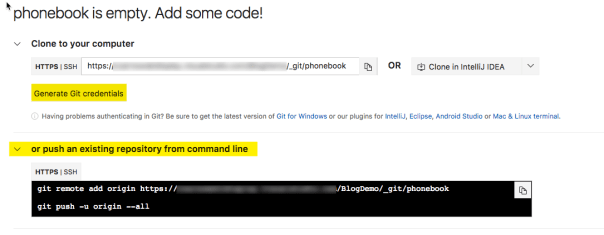
You can see the exact commands that we will need. Also you may need to generate Git credentials if this is the first time you have tried to have git and VSTS talk from your machine.

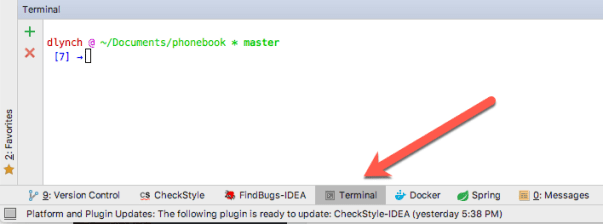
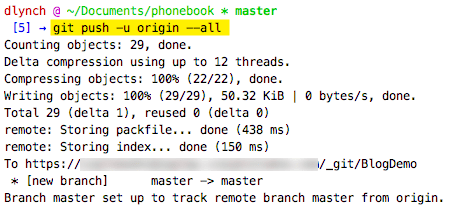
To make things even easier you don;t need to open a separate terminal application. IntelliJ gives you a terminal window by clicking on the terminal option in the bottom toolbar. It opens the terminal in the correct directory so you just have to copy and paste those two commands from VSTS to the terminal tab

and now if you return back to VSTS and click on the Code tab you will see your source controlled git repository.

One thing to note is that a single VSTS project supports having multiple repositories. If you want to add a second repository to a project you can get IntelliJ to do the work by selecting the ‘Import into Team Services GIT’ option on the menu in the first screenshot above, selecting the project and giving the repository a name.

We are now ready to start writing code…

Tagged with: , , ,
Posted in Domino To Spring

Getting started with IntelliJ

Now that the project is ready over in VSTS it is time to start the project in your IDE. The choice of IDE is really a personal preference, I am going to be using IntelliJ IDEA Ultimate (the community version does not have the Spring Initializer). If you are using Eclipse I will recommend that you look at the Spring Tools Suite.

Start up IntelliJ and click the option to create a new Project.

Select the Spring Initializer from the list of project types and then click Next.

Give your project some details, the Group and Package are normally your reverses domain name and then the artifact and name are normally your project name.

On the next screen you can select what Spring Boot Starters you want to initially include in the project. A Spring Boot Starter added additional functionality to the project and configures that functionality with basic defaults for you. Over on the right you can see a list of the starters I have selected and what category you will find them under. I’ll discuss the selected options in later blog posts.

After you click next you will be prompted to save the project somewhere on disk and then IntelliJ will open a workspace window with your new project in it.

You may see a warning message about a non-managed pom file. If you do then you should click the ‘Add as Maven Project’ option.

Once completed you will see the basic outline of your new project. A src folder has been setup for you with the main java source for your application and a resources folder for the html and css files. There is also a test folder where you can store all your java testing files.

In the next post I will show you how to get this moved up to VSTS.

Tagged with: , ,
Posted in Domino To Spring, Uncategorized

Getting started with VisualStudio Team Services

Before I even start writing any code I am going to set up a new project in Microsoft Visual Studio Team Services.

If you do not have a source control repository and issue tracking system yet then I would highly recommend looking at VSTS. It really can give you a full end to end pipeline so that you can take that idea you have had for the next big application all the way from being written on the back of beer mat to an automatically deployed application with VSTS helping in all the steps in-between. VSTS also has a vibrant marketplace of add-ons that can extend VSTS. But best of all VSTS is cloud based so you don’t have to worry about deploying hardware and making sure you always keep it up to date.

VSTS is free up to 5 users and provides you with up to 240 free minutes of build time a month when you use a hosted build pipeline or you can use a private pipeline if you want to create your own build agent on your own hardware. You get one private pipeline for free and you can use that as much as you need to, no limit on minutes. Additional users cost $6 a month and additional pipelines cost $15 a month ( hosted or private ) but you should/will be able to do everything you need for the free subscription if you have a small team.

Once you have set up VSTS just log in and select the option to create a new project.

Make sure you select GIT for your version control and Agile for the Work Item Process.

Now that the project has been created we can switch over to our IDE to kick things off.

Tagged with: , , ,
Posted in Domino To Spring

And So We Find Ourselves Back At The Start Again…

A very long time ago I wrote a fifty something long blog series about learning XPages where I wrote a simple phonebook type application. It was pretty well received and probably helped a few people get on the road to writing XPage style applications. It was basic, it didn’t involve any Java backend stuff and I know if I was doing it again in XPages I would do it completely different.

Now we have a brand new development stack and I find myself back at the starting blocks again but this time I am armed with the java knowledge I learnt during my time writing XPage apps, I have my development, build and release environment mapped out and it is time to start writing code again.

I’m not going to try and duplicate the old Learning XPages series but I am going to try and work though an entire application from start to finish where the finish line is having the application automatically deployed on our production environment. I won’t be going in to the code at the level I did for Learning XPages but I will point out how similar concepts in XPages translate over to my Java application but this is not a Learning Java series or a Learning Spring series.

This is going to be part Code, part Spring, part Thymeleaf, part DevOps, part VSTS, part Docker, part Rancher. Pretty much everything I have described in the last few blog about what it takes to replace Domino. I’m going to show you how I’m using it so that if you decide on similar parts for your Domino replacement stack you will have a basic understanding of how to get things going.

And I’m not numbering the parts this time 🙂

Posted in Domino To Spring, Uncategorized
Archives