Defining Your VSTS Build

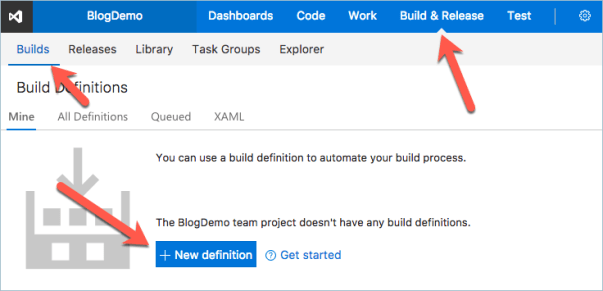
The build definition in VSTS is designed to build and compile your code and then take the resulting build and save them to an artifact store. You can create build definitions for Visual Studio applications, XCode applications, Android applications and, of course, Java applications. In VSTS go to the Build & Release section of your project and then make sure you are on the Builds tab. Click on the New Definition button to get started.

You should see a list of predefined build templates, the one that we are interested in is the Maven template so I’m going to go ahead and select that one as my starting point. The default Maven template should pretty much work as is but I’m going to make a few minor changes so that it will always build on our new VSTS Build Agent.

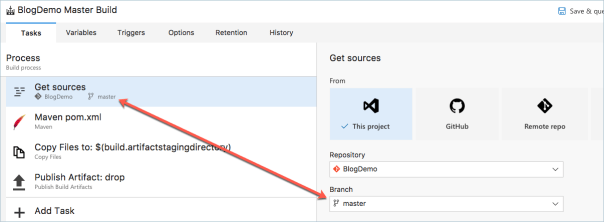
First lets make sure that we are building the right thing. On the Tasks tab you should see what sources it is building. It should say the name of your repository and the master branch. If not then select the correct branch.

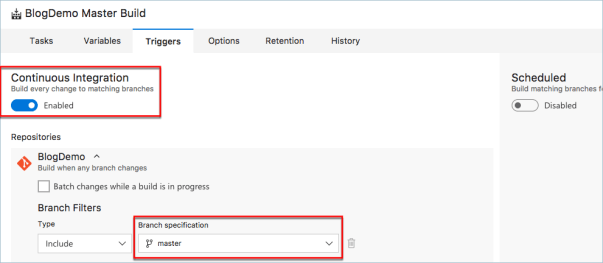
Over on the Triggers tab you should enable the Continuous Integration section. This will make sure that a build is triggered every time new code is pushed to the master branch. You can also setup scheduled builds so if you have some sort of nightly build process you can automate that here.

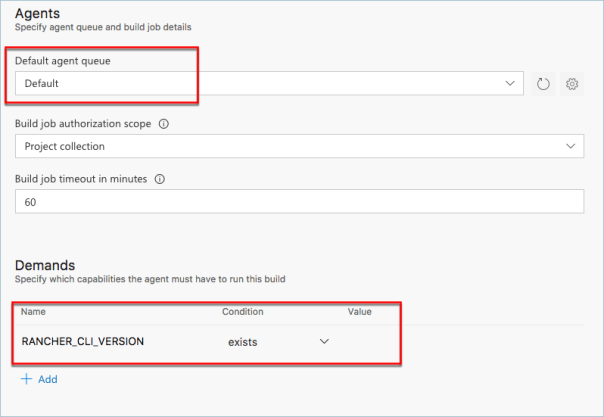
The Options tab contains the section that we need to specify the build agent. When we started the VSTS Build Agent it was created in the ‘Default’ agent queue so make sure you have selected that as your queue and you have not selected either of the hosted options.

If you have multiple private build agents and not all of them are based on the Rancher VSTS Build Agent then you will need to add a ‘Demand’. When the build is queued it will look for a build agent that meets all the required demands, this is how you can make sure that Visual Studio builds run on windows boxes and XCode builds run on OS X boxes.

The Rancher VSTS Build Agent sets an environment variable of RANCHER_CLI_VERSION so I’m adding a demand to ensure that this exists. I’m not using any specific Rancher features during the build process but I know that the agent has Maven on it so it is a logical choice to use that agent.

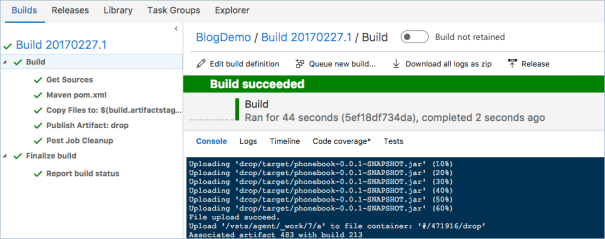
I can now save my build definition and run it for the first time. The build process will start on the different stages and your screen will update as each stage completes ( or fails ). Once completed you can select any of the stages on the left side to review the logs for that stage.

2017-02-27_08-50-05

Now that we have a successful build we can start the process of deployment.

Advertisement
Tagged with: ,
Posted in Domino To Spring

A VSTS Build Agent For Rancher

By default Visual Studio Team Services provides you with one hosted pipeline and one private pipeline when you are using the free services. You can add additional pipelines at a cost of $15 a month if you need them however a single pipeline should work ok for a small team.

The private pipeline is something that you run on your own infrastructure and Microsoft provides pipeline agents that will run on Windows, OS X and Linux machines. These agents will listen to your VSTS account and accept jobs for running build and releases. For the purposes of the Rancher/Docker infrastructure I am running a private build agent on a Ubuntu Linux box with some additional Rancher API access features added in and I’m also running it on my Rancher Infrastructure.

First we need to add a stack to run our service in. In the development environment click the Add Stack button. I’m going to called mine ‘tools’ and then just create an empty stack.

2017-02-26_14-58-55

Next I click on the ‘Add Service’ button.

To save a some time Microsoft already provides their Ubuntu VSTS Agent as a docker image so you can easily use this as your starting image. To save even more time, however, I have built my own personal docker image that is based on the Microsoft image and adds in the Rancher Command Line Interface and an addition Rancher API script that can do a few things that the Rancher CLI currently can’t do.

If you want to look at the DockerFile it is available in my GitHub repository and the image is available on Docker Hub.

Don’t forget to add your VSTS Environment variables to the container before you start it up or it will fail.

Once you have it running you will see it listed in the tools stack

Now we can start getting VSTS to build our application on our private pipeline box.

Tagged with: ,
Posted in Domino To Spring

Extending Your Rancher Environments

In the last post we setup the Rancher server and added our first Rancher Host. One of the nice features of Rancher is that you can setup multiple environments so that you can keep your Development testing system separate from your QA system and separate from the Production system yet keep a single Rancher server orchestrating it all.

Click on the ‘Environment’ tab and select the option to ‘Manage Environments’

2017-02-26_12-36-58

The first thing I’m going to do is rename the Default environment to Development by clicking on the ‘Edit’ button.

2017-02-26_12-38-49

I will then click on the ‘Add Environment’ Button to create my new environments. I’ll called One Testing and the other Production. In both cases I will leave the Orchestration Type set as Cattle but as you can see Rancher can also manage other types of Orchestration systems making it very powerful.

Once the new environments are created you will notice that they are listed as unhealthy. This is because there are no hosts assigned to those environments yet.

Select one of your new environments and then add a new host just like you did for the first host. Once you have added a host for all your environments they should all say active.

In a real production environment you would probably have multiple hosts per environment depending on your needs for scaling and backup. When you have multiple hosts in a single environment Rancher can look after scaling apps so that you have the same container running on multiple hosts and can also start a container running on a different host if one of the other hosts is down.

Tagged with:
Posted in Domino To Spring

Setting Up Your Rancher Infrastructure

Before we can build and deploy our application we will need to first setup the infrastructure. I’ve decided that I’m going to be using Docker as the container service and Rancher as the orchestration layer. This blog post is just a quick overview of how to create a basic demo Docker/Rancher infrastructure. If you are considering using Docker/Rancher for production that I would highly encourage you to do plenty of additional research beyond this posting before setting anything up.

For the demo I’ve decided that I’m going to keep things simple and use a number of VMs running on my host machine to simulate a tiny production environment.  I have setup 4 VMs with 4Gb Ram each and all running RancherOS. RancherOS is not needed to run Rancher, Rancher can run on any host that can run Docker. I’m just using it for my demo to make it easier as the RancherOS already has Docker all setup for you.

The first of my virtual machines will be dedicated to be the Rancher Server. Setting up the rancher server is as simple as running a quick docker command to start the rancher server container.

docker run -d --restart=unless-stopped -p 8080:8080 rancher/server

This will start the download of the rancher server container and start it up. This is the most basic of commands and will setup a simple rancher server with a built in MySQL server. For production you should use an external MySQL server and also setup SSL.

Once the Rancher Server is up and running you should be able to access it in your web browser and access the VMs IP address on port 8080. You will notice that you were not asked to log in. By default Rancher comes with security turned off. In a production environment you should turn it on. A indicator on the admin dropdown will remind you that security is disabled.

2017-02-26_12-17-12

Before we can deploy any containers we need to add our first Rancher Host. Typically this is another machine that is running docker, however you can setup your Rancher Server to also be a host if you want but not really recommended for production. I have a second VM that I will run a host on.  After clicking on the Add A Host link you will be brought to a screen to add your first host. I’m using the Custom Host which is basically any machine running Docker but you may also notice that they have hooks in to Azure, Amazon and other cloud providers to make it easy to create VMs on those systems.

2017-02-26_12-25-52

Run the supplied command to start a Rancher Agent on your selected host machine and then go to the Infrastructure/Hosts tab. After a few minutes your new host will appear and start configuring itself.

2017-02-26_12-29-43

Congratulations, you now have your first Rancher Host and you can start deploying docker containers. In the next post I will extend my rancher system to provide separate environments for Testing and Production.

Tagged with: , , ,
Posted in Domino To Spring
Archives