In the last post we setup the Rancher server and added our first Rancher Host. One of the nice features of Rancher is that you can setup multiple environments so that you can keep your Development testing system separate from your QA system and separate from the Production system yet keep a single Rancher server orchestrating it all.
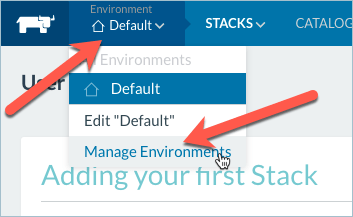
Click on the ‘Environment’ tab and select the option to ‘Manage Environments’
The first thing I’m going to do is rename the Default environment to Development by clicking on the ‘Edit’ button.

I will then click on the ‘Add Environment’ Button to create my new environments. I’ll called One Testing and the other Production. In both cases I will leave the Orchestration Type set as Cattle but as you can see Rancher can also manage other types of Orchestration systems making it very powerful.

Once the new environments are created you will notice that they are listed as unhealthy. This is because there are no hosts assigned to those environments yet.
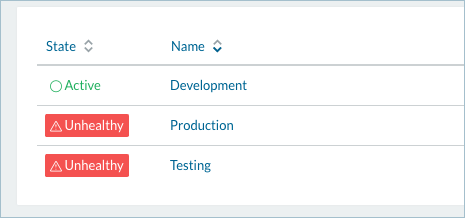
Select one of your new environments and then add a new host just like you did for the first host. Once you have added a host for all your environments they should all say active.

In a real production environment you would probably have multiple hosts per environment depending on your needs for scaling and backup. When you have multiple hosts in a single environment Rancher can look after scaling apps so that you have the same container running on multiple hosts and can also start a container running on a different host if one of the other hosts is down.

You must be logged in to post a comment.