Controlling The Frontend

Before we can start building our frontend we need to tell our Spring Boot application how to handle the incoming requests and what html page to display. This is done using Spring MVC which we added when we picked the spring-boot-starter-web dependency in the Spring Initializer. This dependency adds a built in tomcat web server that is configured with a set of defaults and sets up the application to scan for special classes that have been annotated with @Controller

When a class is annotated with @Controller Spring MVC knows that it will contain methods that have been annotated in such a way that the method can be mapped to a specific request.

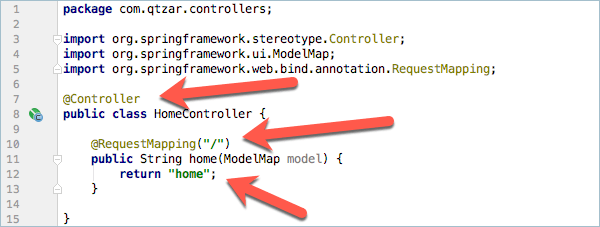
I’ve created a new package in my source to hold all my controllers called, you guessed it, controllers. In here I have created a new java class called HomeController and I have annotated it the @Controller annotation above the class name. I then added a single method to the class and I have annotated that with @RequestMapping(“/”) which means whenever a request comes in that matches the root of the site you should return the string ‘home’.

This returned string is intercepted by Spring MVC and is passed to the configured template renderer which in our case is Thymeleaf. Thymeleaf will then look in the resources/templates folder for a html file called home.html and will send that to the web browser.

If we were to run the application right now we would get an error as we don’t have that html file yet.

The other thing to notice is that the RequestMapping method accepts a ModelMap called model. This is where we can add data to the model so that when the Thymeleaf processor is rendering the page it can take the data from the model and slot it in to place, This is very like how an XPage application can put values in to the rendered html. Right now I’m not putting anything in to the model so I’ll come back to that later.

Tagged with: , ,
Posted in Domino To Spring, None

Extending Your Entity Repositories

Now that the basic CRUD interface is working it would be nice if we could extend the interface to make it even more useful. What if we wanted to return a list of all the locations in a particular state or if we wanted to find all the people who are in a particular location?

These sound like queries that you would normally write in SQL with something like ‘SELECT * FROM Locations WHERE State =”PA” ‘. To do this in Spring Boot and Spring Data Repositories you can use the simple query builder to add a single line to your repository.

This will return a List of Location objects when I pass in a string that matches a state. The @Param(“state”) is used as part of the REST interface that I’m also building and allows me to specify how this particular parameter will be passed on the URL.

On my PersonRepository  I have added two additional query builders.

So now I can get a list of Person objects when I pass in a location id or I can get a list of Person objects when I pass in a manager id.

The Query Builder system in Spring Data Repositories is very powerful. findBy is just one of many method names that you can use. You can add additional query keywords like AND, NOT, OR etc. If your data entity has a date field you can do something like findByDateFieldBetween(date1,date2) and the query builder will build a query to find records just between those two dates.

I highly recommend reading the Query Builder documentation.

Tagged with: , ,
Posted in Domino To Spring, None

Thats just a load of CRUD

CRUD stands for Create, Read, Update and Delete which are probably the most basic of things that you can do to a piece of data. Spring Boot gives you a very easy way to setup an interface between your application logic and your data entities that can provide this CRUD interface without making you write a ton of code with what is known as a repository.

A repository is just a set of data entities, So for our application we will need two repositories, one for the Location entity and one for the Person entity. I’ve created a new package in my application to hold these called repositories. This is the LocationRepository

and this is the PersonRepository

These are both interfaces and they extend another interface called CrudRepository which will give you all the basic CRUD operations.

Assuming that I have setup access to my repository ( which I will show later ) I can now use any of the above methods on the repository to Create, Read, Update and Delete data from the repository. deleteAll() will obviously delete all the entities in the repository and findAll() will return all the entities that you can then iterate through. count() will tell you how many entities are in the repository.

Tagged with: , , ,
Posted in Domino To Spring, None

Pushing your changes to GIT on VSTS

So we have created our first two code changes and you are now ready to commit them to git. My rule is to commit often as this gives you a much better granularity for figuring out when bugs are introduced to the code and then being about to revert just those small changesets.

To commit your changes select the VCS menu in IntelliJ and click on Commit.

You should see a dialog box similar to the one above which shows the two new classes you have added to your application. You can then fill in the commit message but before you actually commit these changes you should also associate them with your User Story in VSTS.

If you have installed the Visual Studio Team Services For IntelliJ IDEA Plugin then you will see an extra icon above the commit message box. Clicking on this will bring up a list of the all the active user stories in VSTS that are assigned to you.

Select the story that you are working on from the list and then click on OK and the commit message box will be updated.

You can now go ahead and commit these changes to git.

When you commit the changes you are only updating your local version of the git repository. To get the changes up to the VSTS server you will also need to push them. Normally I will push my changes up every few hours and always push at the end of the day so that I know they are safe on the server in case something were to happen my machine.

In IntelliJ go to the VCS –> Git –> Push menu option

You will see a list of all the commits that you are pushing to the server and at the top will be verification that you are pushing them from your local story branch to the server story branch. If you see ‘master’ as the local branch the you forgot to check out the story local branch before commiting and you should move the commits from the master branch to the local story branch before you continue.

Back over in VSTS you will be able to see your new code commits.

and on the Code –> Branches section in VSTS

You can see all your branches and how far ahead ( or behind ) they are with the master branch.

Tagged with: , ,
Posted in Domino To Spring, None
Archives