Adding More Fake Data

In the last entry we added our new People By Location page and when we looked at in the the browser is was fairly empty apart from the one test user.

Not very easy to do any proper testing with just one entry. You COULD if you wanted add a bunch more test users manually but what if you wanted to test with a few thousand users, that would be a lot of copy/pasting.

Thankfully there is an easier way using a Data Faker.

First I need to add a new dependency to my pom file for the JavaFaker project on GitHub

Now in my DemoData class I just need to instantiate the Faker object and then I can call the different accessors to pull out different pieces of random data.

As I have three locations setup in my demo data I have also decided to randomly select one of the locations to put my fake data in to. I then encapsulate it in a loop and I can easily generate as much demo data as I need to properly test the application.


Tagged with:
Posted in Domino To Spring

Add The People By Location Page

Now that the controller is created and has been committed to our source control it is time to create the page that is associated with it. I’ve started by copying the home.html page to it’s own file called location.html (to match the string returned by the controller in the last entry). I’ll break this in to components in a later part but for now a quick copy is all I need to get the exact same layout as the home page.

For the list of peoples details I’ve decided to use DataTables. This is a jQuery plugin for displaying table data in interactive tables that adds filtering and pagination as required. Just like Bootstrap I could add the DataTables to the static folders in my resources but instead I’m going to make use of WebJars again and import it via a Maven dependency. I’m also excluding jQuery as I’m already importing newer version of it.

I then add the CSS and JS to my page using the same method as I did for BootStrap

We then need to add our table to the page. This is just a standard html table. It has been styled using the BootStrap table styling with the bootstrap table striping and bootstrap table border classes.

The interesting part of the table is the <tr> tag. You can see that here I am using another th:each tag to do a thymeleaf based loop of add the data that was passed in to the model under the people attribute.

Finally I need to tell DataTables to activate against my new table. This is done with a little extra javascript. I’ve elected to out the javascript in to its own file in the static/js folder called phonebook.js and then add it on to the page via a script tag.

Now when I run my application and view my page I see the following results

It is starting to look good but kinda sparse. In the next section I’ll add some more fake data using a generator.

Tagged with: ,
Posted in Domino To Spring

Adding The People By Location Controller

Now that we have the main landing page of the application created it is time to build our next page. To start the process of I have gone to VSTS and dragged the ‘See All Staff In A Single Location’ story over to the Active column.

I can now return to IntelliJ and start building my next controller. I’m going to add a new controller class to the application called LocationController. Don;t forget to annotate the called with the @Controller annotation so that Spring MVC will pick it up correctly.

The @RequestMapping annotation is set as /location/{id}. This part in the curly brackets is a dynamic mapping so that the request mapping will match a url like /location/PA or /location/NY etc. You can, in theory, match multiple parts of the incoming request so that something like /location/{state}/{city} would match a url of /location/pa/pittsburgh.

To extract the value that is being passed in on the dynamic RequestMapping you use the @PathVariable annotation in the methods signature.In this case I’m extracting ‘id’ from /location/{id}. if I was writing a signature to match the state/city example above I would write something like location(@PathVariable(“state”) String state, @PathVariable(“city”) String city, ModelMap model).

You will also notice I have autowired in the two repositories in my application and I’m adding all the locations in to the model just as I did with the main landing page (because the list of locations is displayed on all pages) and I have added a call to my personRepository that will return all the people in the specified location.

Next I’ll add this info to a html template called location.html

Tagged with: ,
Posted in Domino To Spring, None

Adding Locations Data To The UI

Now that we have our demo data and we have confirmed that it exists when we start the application it is time to add it to the Thymeleaf based UI.

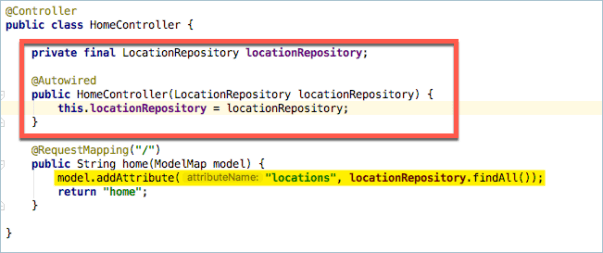
First we need to add it to the data model that is used when the page is rendered. If we return to our HomeController class we need to make a couple of changes. First we need to get access to the LocationRepository bean. We do this by adding an Autowired reference the bean using the same method that we did when building the demo data.

Then we need to add this to the model. The model is pretty much a java map of strings and objects. In the highlighted line below you can see that I’ve used the model.addAttribute method to create an entry called ‘locations’ and the object passed in to that attribute is the findAll() method of the locationRepository.

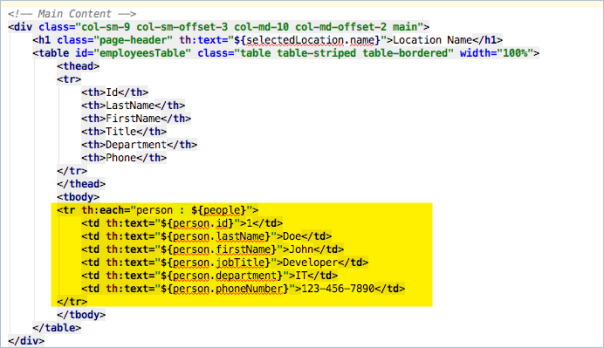
Now we need to turn our attention to the thymeleaf html page. I’ve added a bunch of other Bootstrap related changes to give the application a basic layout and I’ve decided that the list of locations should appear in the side navigator. I’m building a standard bootstrap styled navigation with some extra Thymeleaf magic.

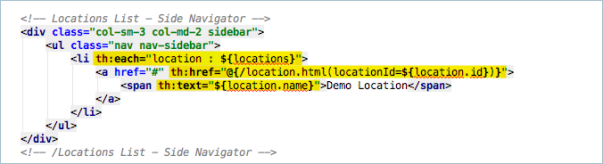
In my LI tag I have a th:each attribute. This is similar to a repeat control in xpages and is written like a loop in java. the ${locations} is  the locations attribute from the model and the th:each will loop through them using a variable name of ‘location’ for each iteration.

In the A tag I have a th:href that contains a thymeleaf expression that will be converted to a url. While it may look a little complex its not really that difficult. Firstly the expression is surrounded with @{…} this tells the thymeleaf renderer that the url being generated is absolute to the base of the application. This allows you to move the application on an application server to a different subpath and none of the paths in the application will break. Next is the reference to the html page that is going to be displayed next /location.html. After that is a section in round brackets, anything in here will be converted to parameters on the url and the path surrounded with the ${…} is a reference back to the loops variable and in this case we are pulling the id from the object.

So the th:href will be translated to /location.html?locationId=xx where xx depends on the selected location.

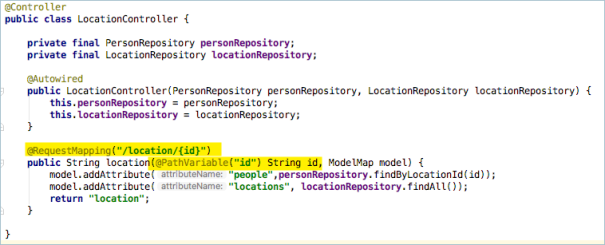
What if you don’t want location.html in the url and want to do something like /location/XX in that case your th:href would look like

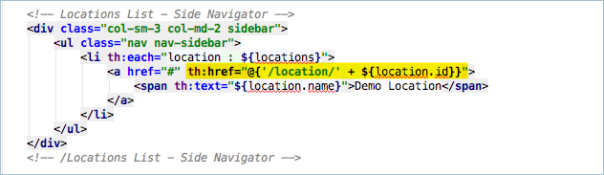
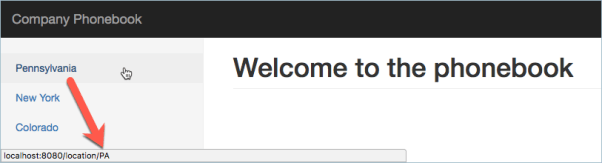
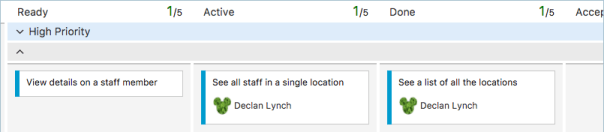
I’m going to leave it like this for my application so that I can show you a great feature in the Spring MVC request mapping controllers next but for now I’v completed my first task of showing a list of the location on the main home page of the application. I can now return to VSTS and drag that card over to the done column and see what is next up to do.

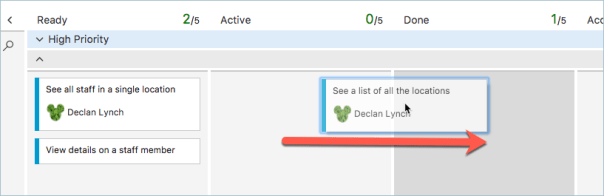
So looks like I’ll be building the location page so that you can see all the staff in a single location. I’ll drag that over to Active and start work on it next.

Tagged with: , , , ,
Posted in Domino To Spring, None
Archives